1. Launching an Amazon EC2 Instance
1.1 AWS Region table with services availability (Northern Virginia or Oregon is recommended)
Check available services at a region AWS Region table with services availability. Apparently, Northern Virginia and Oregon stand out as more services are available than the others, and they are recommended for North American users. Choosing either one may reduce potential costs for inter-region data transfer.
1.2 Launch An AWS EC2 Server And Set Up Ubuntu 16.04 On It
Here is a great step-by-step tutorial. Pay attention to the Security Group and Setting the locale, proper setup means less hassle in a later stage.
2. Set up the Environment
2.1. Access the instance with SSH
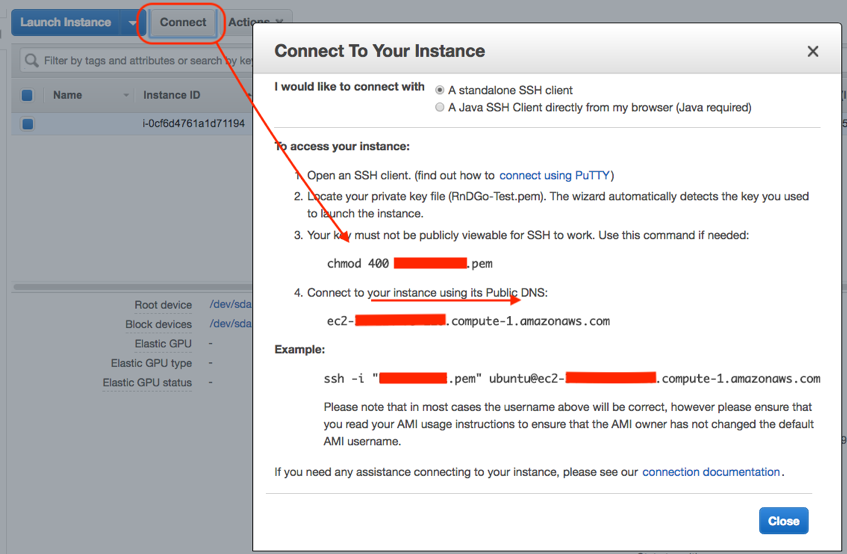
- Go to your AWS console and click
Instanceson the side menu. - Choose a running instance and click
Connect, you will find the guideline page, as following:

Follow the steps in the picture above, you should be able to connect to your EC2 instance.
2.2. Update and upgrade packages
$ sudo apt-get update
$ sudo apt-get upgrade
2.3. Install LAMP (Linux Apache MySQL PHP) Stack with one command (though PHP is not used).
$ sudo apt-get install lamp-server^
- Unless you are sure what you want to do, you should choose
YesorOKfor options. - You will be prompted a screen for settings. Here is the password setting screen for
MySql-server-5.7(8 digits minimum for 5.7+ please)

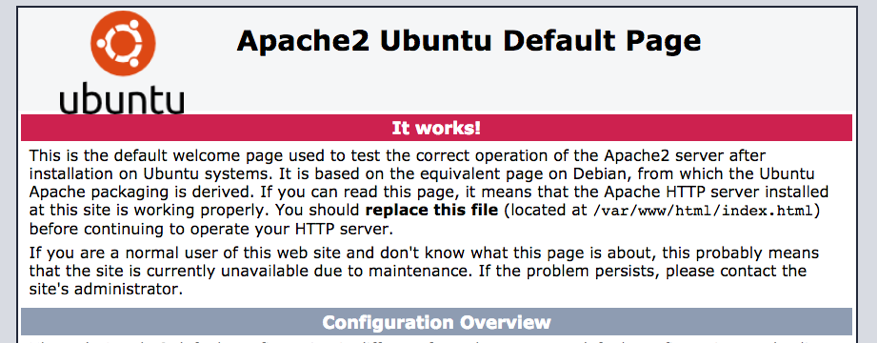
After that, go to the ip address of the AWS instance, you should be seeing a page like this:

2.4. Install and enable ‘wsgi-mod’ module for Apache2 to run Django
$ sudo apt-get install libapache2-mod-wsgi
$ sudo a2enmod wsgi
2.5. Install python2.7 and some basic packages. (Ubuntu 16.04 comes with python3.5 by default)
As my app is running on python 2.7. I am installing python 2.7 here.
$ sudo apt-get install python-pip
$ sudo apt-get install libmysqlclient-dev
$ sudo apt-get install python-dev
$ sudo apt-get install build-essential
2.6. Install virtual environment package and mysql connector
$ pip install virtualenv
$ pip install mysql-python
2.7. Create a folder for your Django app
$ mkdir [your_folder_name]
2.8. Create a virtual environment for the Django app
$ cd [your_folder_name]
$ virtualenv venv
3. Deploying your Django web app
3.1 Clone your Django web app from a remote repo (you can use automated deploying tools to do this instead)
$ cd [your_folder_name]
$ git clone [your_remote_app_repo]
3.2 Create a database using the ‘utf8mb4’ character set (do not miss the semi-comma ‘;’ at the end).
$ mysql –u root –p

mysql> CREATE DATABASE [your_db_name] CHARACTER SET utf8mb4 COLLATE utf8mb4_unicode_ci;
3.3 Configure the database section in your ‘settings.py’ file
DATABASES = {
    "default": {
        "ENGINE": "django.db.backends.mysql",
        'NAME': 'your_db_name',
        'USER': 'user_name',
        'PASSWORD': 'mysql_password',
        'HOST': '',
        'PORT': '3306',
        'OPTIONS': {
            'init_command': "SET sql_mode='STRICT_TRANS_TABLES'",
            'charset': 'utf8mb4',
        },
    }
 }
3.4 Install MySql client for Django (or when facing ‘mysql_config: not found’ error)
$ sudo apt-get install libmysqlclient-dev
$ pip install mysql-python
3.5 Configure ‘wsgi.py’ to add python interpreter path on top
import os, sys

sys.path.append('/home/your/settings.py/folder)
sys.path.append('/home/your/venv/lib/python2.7/site-packages')
sys.path.append('/home/your/venv/lib/python2.7/dist-packages')
sys.path.append('/home/your/venv/lib64/python2.7/site-packages')
sys.path.append('/home/your/venv/lib64/python2.7/dist-packages')
3.6 Collect static files (js, img, css, etc.)
$ cd [your_project_folder]
$ source venv/bin/activate
$ cd [your_django_app_folder]
$ python manage.py collectstatic
3.7 Configure Apache2
- To configure the WSGI pass, we’ll need to add some additional items to the default virtual host file:
sudo nano /etc/apache2/apache2.conf
- To start, let’s configure the static files. We will use an alias to tell Apache to map any requests to the “static” directory within our project folder.
<VirtualHost *:80>
    . . .
    Alias /static /home/your/project/static/folder
    <Directory /home/your/project/static/folder>
        Require all granted
    </Directory>

</VirtualHost>
- Next, we’ll grant access to the wsgi.py file within the second level project directory where the Django code is stored.
<VirtualHost *:80>
    . . .
    Alias /static /home/ your/project/static/folder
    <Directory /home/your/project/static/folder>
        Require all granted
</Directory>

<Directory /home/your/project/wsgi.py_folder>
    <Files wsgi.py>
        Require all granted
    </Files>
</Directory>
</VirtualHost>
- Then, set the
WSGIDaemonProcess(python in the virtual environment),WSGIProcessGroup(you_project_name),WSGIScriptAlias(you_wsgi.py_path) directive:
<VirtualHost *:80>
    . . .
    Alias /static /home/ your/project/static/folder
    <Directory /home/your/project/static/folder>
        Require all granted
</Directory>

<Directory /home/your/project/wsgi.py_folder>
    <Files wsgi.py>
        Require all granted
    </Files>
</Directory>

WSGIDaemonProcess your_project_name python-home=/home/your/venv/folder python-path=/home/your/project/folder
WSGIProcessGroup your_project_name
WSGIScriptAlias / /home/your/project/folder/wsgi.py

</VirtualHost>
- Setup firewall: remove port 8000 and add an exception to allow traffic to the Apache process:
$ sudo ufw delete allow 8000
$ sudo ufw allow 'Apache Full'
- Check your Apache files to make sure you did not make any syntax errors:
$ sudo apache2ctl configtest
As long as the last line of output looks like this, your files are in good shape:
  Output
	...
  Syntax OK
4. Make the server running
- Update the everything again
$ sudo apt-get update
$ sudo apt-get upgrade
- Reboot the system, and make sure Apache and MySQL services are running.
$ sudo reboot
$ sudo service mysql restart
$ sudo service apache2 restart
Now your Django app should be running.
5. DEBUG and Q&A
- How to check Apache log?
$ sudo nano /var/log/apache2/error.log
